Disclaimer * Note Legali

Showing posts with label benefit. Show all posts

Monday, November 10, 2014

Autumn looks: cranberry/burgundy smoky eyes

Cranberry and burgundy are two of those colors that often come back on trend, especially during the fall season when they seem to be matching the nature all around us. 

As beautiful as they are, those colors are not so easy to wear (unless you have dark skin, in which case you can rock them on a daily basis). Here are two looks that will allow you to rock cranberry and burgundy without having to opt for the "gothic doll" look (that is, cranberry eyeshadow paired with a full-on black liner). 

1. Apply a cream burgundy base all over the lid, up to the eye socket - which was Benefit's Creaseless Cream in Stiletto for me;
2. Apply a deep plum matte shade on the outer corner, outer crease - for me, that was MAC's Sketch eyeshadow;
3. Add a a caramel colored eyeshadow to blend those two colors in the crease, and smoke it out towards the browbone. I used Vernau by Illamasqua; 
4. This step is optional, but you can place a motherpearl eyeshadow in the center of the lid to highlight. I used Madreperla by Nabla;
5. The inner corner must be well highlighted, but very light colors can have that goth effect. Try a gold eyeshadow instead. Mine was Nabla's Glitz;
6. Repeat the steps on the lower lashline;
7. Use your plum eyeshadow to line the upper and lower lashline, but stop at one third of the lid. 
8. Apply plenty of mascara.

Try to highlight your browbone with something that is the same color of your skin. You can also use your setting powder if you wish. 
This is a rounded shaped smoky eye. Another tip is try using a golden eye pencil on the inner rim, instead of a black one.

The second look is simpler, and more elongated.


1. Apply your burgundy base - which is once again Benefit's Stiletto here; 
2. Apply MAC's Trax eyeshadow all over the lid. Stop at the socket, and let the burgundy base be the darker color that frames your eyes; 
3. Apply a peachy shade with golden specks to the inner corner. The one I used was Chanel's Abstraction;
4. Coat on your lashes with your black mascara (the one I used wasn't really a great one);
5. Highlight your browbone very lightly, and repeat the color scheme on the lower lashline.

Again, try to use something different than black for your inner rim. 

So, will you give your burgundy and cranberry eyeshadows another go now? 
Which one of these looks is your favorite? 
Are you afraid of the "smoke weed everyday" effect, and what are your strategies to counteract it?


***

Gli ombretti color borgogna e cranberry tornano spesso di moda, soprattutto per la stagione autunnale, quando sembrano andar d'accordo con la natura che cambia intorno a noi. 
Nonostante siano dei colori splendidi, non sempre si portano facilmente. Qui sopra vi ho proposto due smoky eyes che si vi permettano di portare questi colori senza dover optare per il look goth, ossia senza doverli portare per forza con l'eyeliner nero. 

Nel primo ho applicato una base color borgogna (la Creaseless Cream in Stiletto di Benefit) su tutto l'occhio, andando a scurirla un po' nell'angolo esterno con un ombretto color prugna matte (Sketch di MAC). Ho poi applicato un ombretto madreperla per illuminare il centro della palpebra (ma questo step è opzionale, e guardandomi indietro forse anche inutile. Comunque ho usato Madreperla di Nabla). Dopodiché ho usato un color marrone caramello per sfumare il tutto dalla piega in su (io ho usato Vernau di Illamasqua). Per illuminare l'angolo interno ho usato un colore dorato, come Glitz di Nabla, evitando così i colori troppo chiari da bambola goth. Infine ho ripetuto lo stesso schema di colori sotto le ciglia inferiori e usato Sketch a mo' di eyeliner nell'angolo esterno superiore e inferiore dell'occhio. Per illuminare sotto l'arcata sopraccigliare ho invece utilizzato un color carne. Potete anche usare la vostra stessa cipria. 
Vi consiglio di utilizzare una matita dorata all'interno dell'occhio, di mettere tanto mascara e di cercare di dare una forma tonda a questo smoky. 

Il secondo look è invece più facile. La base è sempre la stessa. Sopra ci ho applicato Trax di MAC, facendo attenzione di non portarlo fino alla piega, e mantenendo invece il color borgogna come cornice dell'occhio. Ho poi applicato un ombretto color pesca con brillantini dorati nell'angolo interno (nel mio caso è Abstraction di Chanel), messo tanto mascara (anche se questo non è dei migliori) e poi illuminato sotto l'arcata sopraccigliare con lo stesso procedimento di prima. Questo look è invece un po' più allungato. Anche in questo caso non consiglio di mettere la matita nera. 

Adesso darete una seconda chance ai vostri ombretti borgogna o cranberry?
Quale di questi due look preferite? 
Avete timore dell'effetto "me faccio 'e canne tutti i giorni" di questi colori e come ovviate al problema?

Wednesday, January 18, 2012

Review: Benefit Creaseless Cream in Flatter me (with swatches)

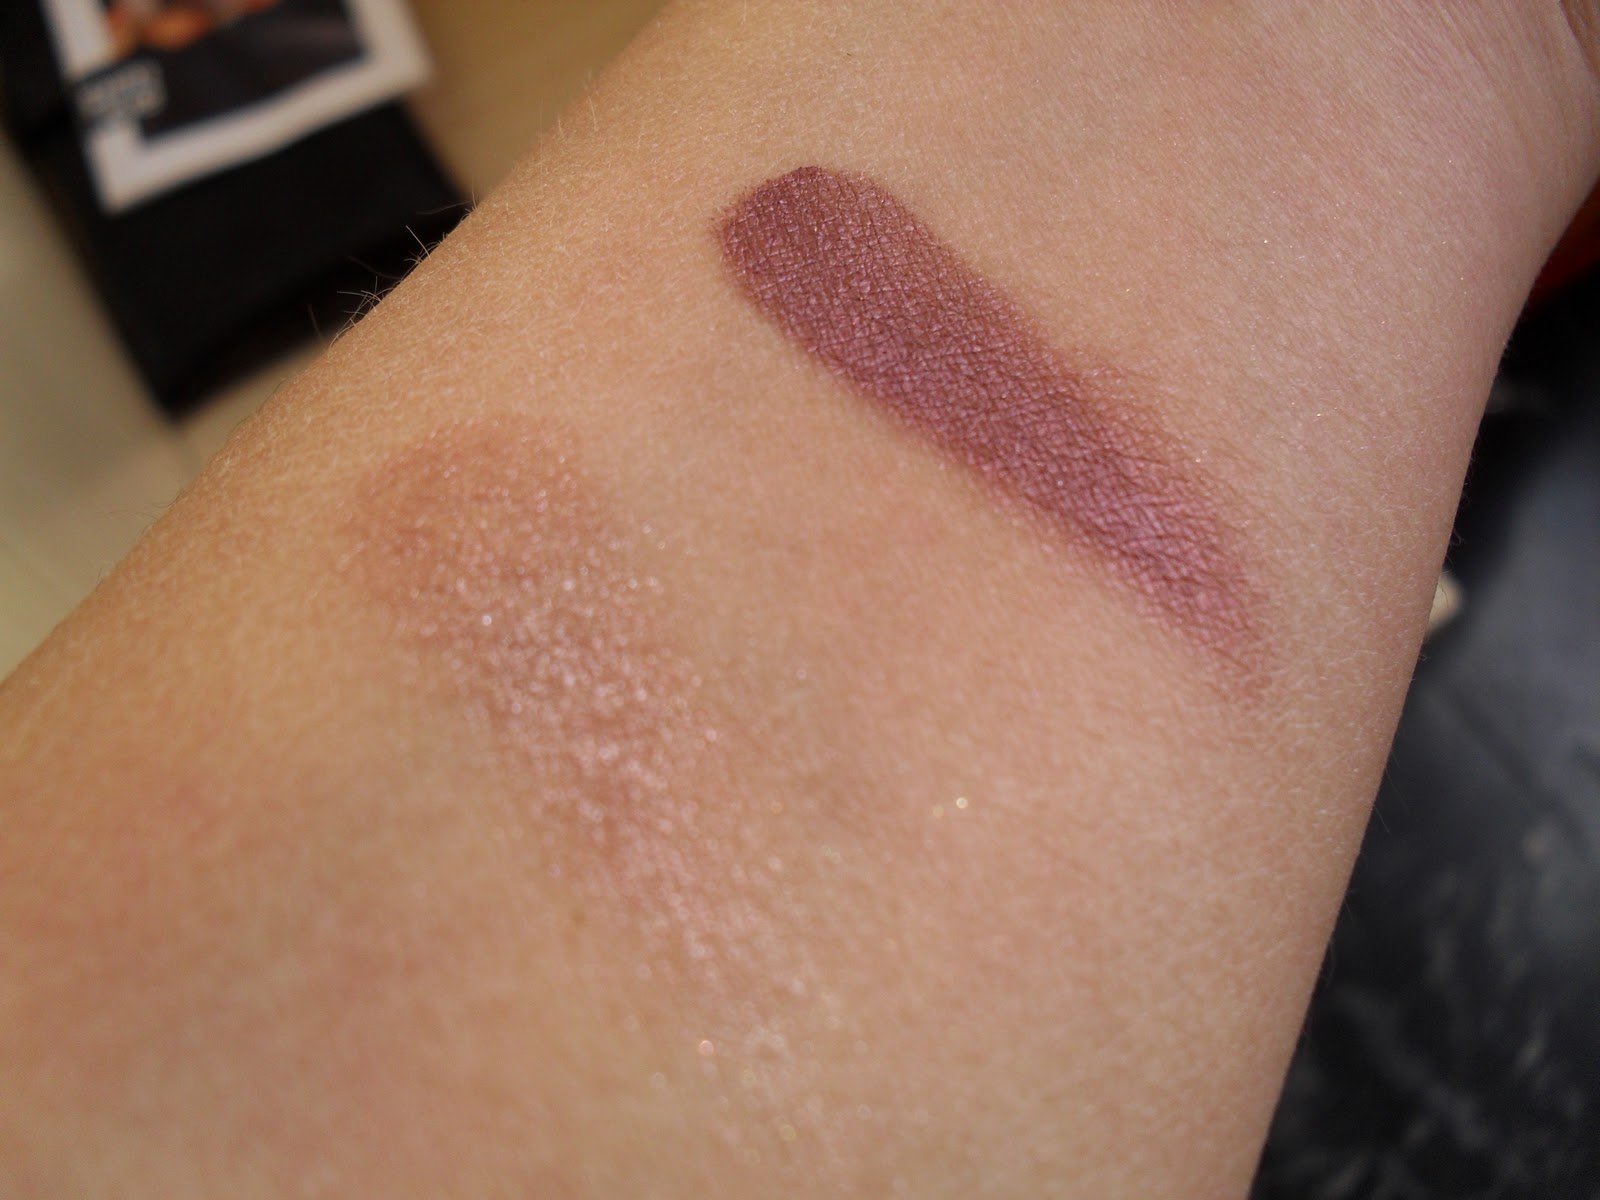
Following my previous post (click here) about Creaseless Cream eyeshadow/liners by Benefit, I'm going to post pictures of the shade Flatter me in this post.
The exact same thing I said about Stiletto can be said about this one.
Please notice my skintone is medium and yellow. This shade may appear stronger on some other skin tones.

In seguito al mio post precedente (clicca qui) sui Creaseless Cream di Benefit, vi parlerò di 
"Flatter me" in questo post.
Le stesse cose dette per Stiletto nel post linkato sopra valgono per questa tonalità.
Da notare, però, è il fatto che la mia pelle è di colore medio e con sottotono giallo.
Questo colore potrebbe, dunque, apparire più forte su altre pelli. 


Screw your cap well after use: mine dried out a bit. // Chiudete bene il tappo dopo l'uso: il mio si stava per seccare!

Flatter me on the left / Flatter me a sinistra

Monday, January 16, 2012

Review: Benefit Creaseless Cream Eyeshadow/liner in Stiletto with swatches

Packaging-wise, the Benefit Creaseless Cream eyeshadows are super cute: the box they're contained in is so vintage, and the actual product is contained in a small round jar that is made of glass. Probably a bit dodgy, if you have the habit of slipping things out of your hands, however it is definitely the best choice to store this type of product. 

Per quel che riguarda il packaging, i Creaseless Cream di Benefit sono carinissimi:
la scatolina in cui sono contenuti è molto vintage e il vero e proprio prodotto è contenuto in una
piccola jar di vetro. Forse è un po' pericolosa, se si ha 
l'abitudine di farsi scappare le cose di mano, ma è decisamente la miglior scelta per mantenere intatto questo tipo di prodotto. 
This is the actual circumference of the jar (the whole image). I have just placed it on the screen and it's that exact size. The cute little doves there, however, are just drawn on a sticker that is cheaply placed on the lid. 

Nella foto sopra vedete la vera circonferenza della jar (l'immagine intera, non solo il tappo). 
L'ho appena poggiata sullo schermo ed è di quella esatta misura.
Quelle colombe carinissime, però, sono solo disegnate su un adesivo attaccato al coperchio.
Ecco, questo magari lo trovo un po' da "cineserìa" (senza offesa, si intende).
Product details on the back of the jar - Dettagli prodotto dietro la jar

As you can see, Creaseless Creams are cream eyeshadows that, as their name suggest, will not crease on your eyes.
This is true: once they set, they are going to stay on your eye all day without creasing, and you do not need an eyeshadow primer underneath. If anything, they can be like your colored primer for powder eyeshadow.
They are generally creamy (well...they're cream eyeshadows) and soft; they apply smoothly with both fingers and brushes (best if you use a flat synthetic one and pat); and they blend easily (again, synthetic blender would be best).

Come potete vedere, i Creaseless Cream sono ombretti in crema che, come ci suggerisce
il loro nome, non faranno le pieghette sugli occhi.
E questo è vero: una volta che si asciugano, stanno lì e non si muovono, non fanno pieghette anche senza bisogno di un primer. Anzi, magari possono fare loro da base colorata per l'ombretto in polvere.
Generalmente sono cremosi (ma va?! è crema) e soffici, si applicano bene
sia con le dita che con il pennello (è meglio usare un pennello sintetico a lingua di gatto e tamponare), 
e si sfumano facilmente (nuovamente, raccomando un pennello da sfumatura sintetico). 
 
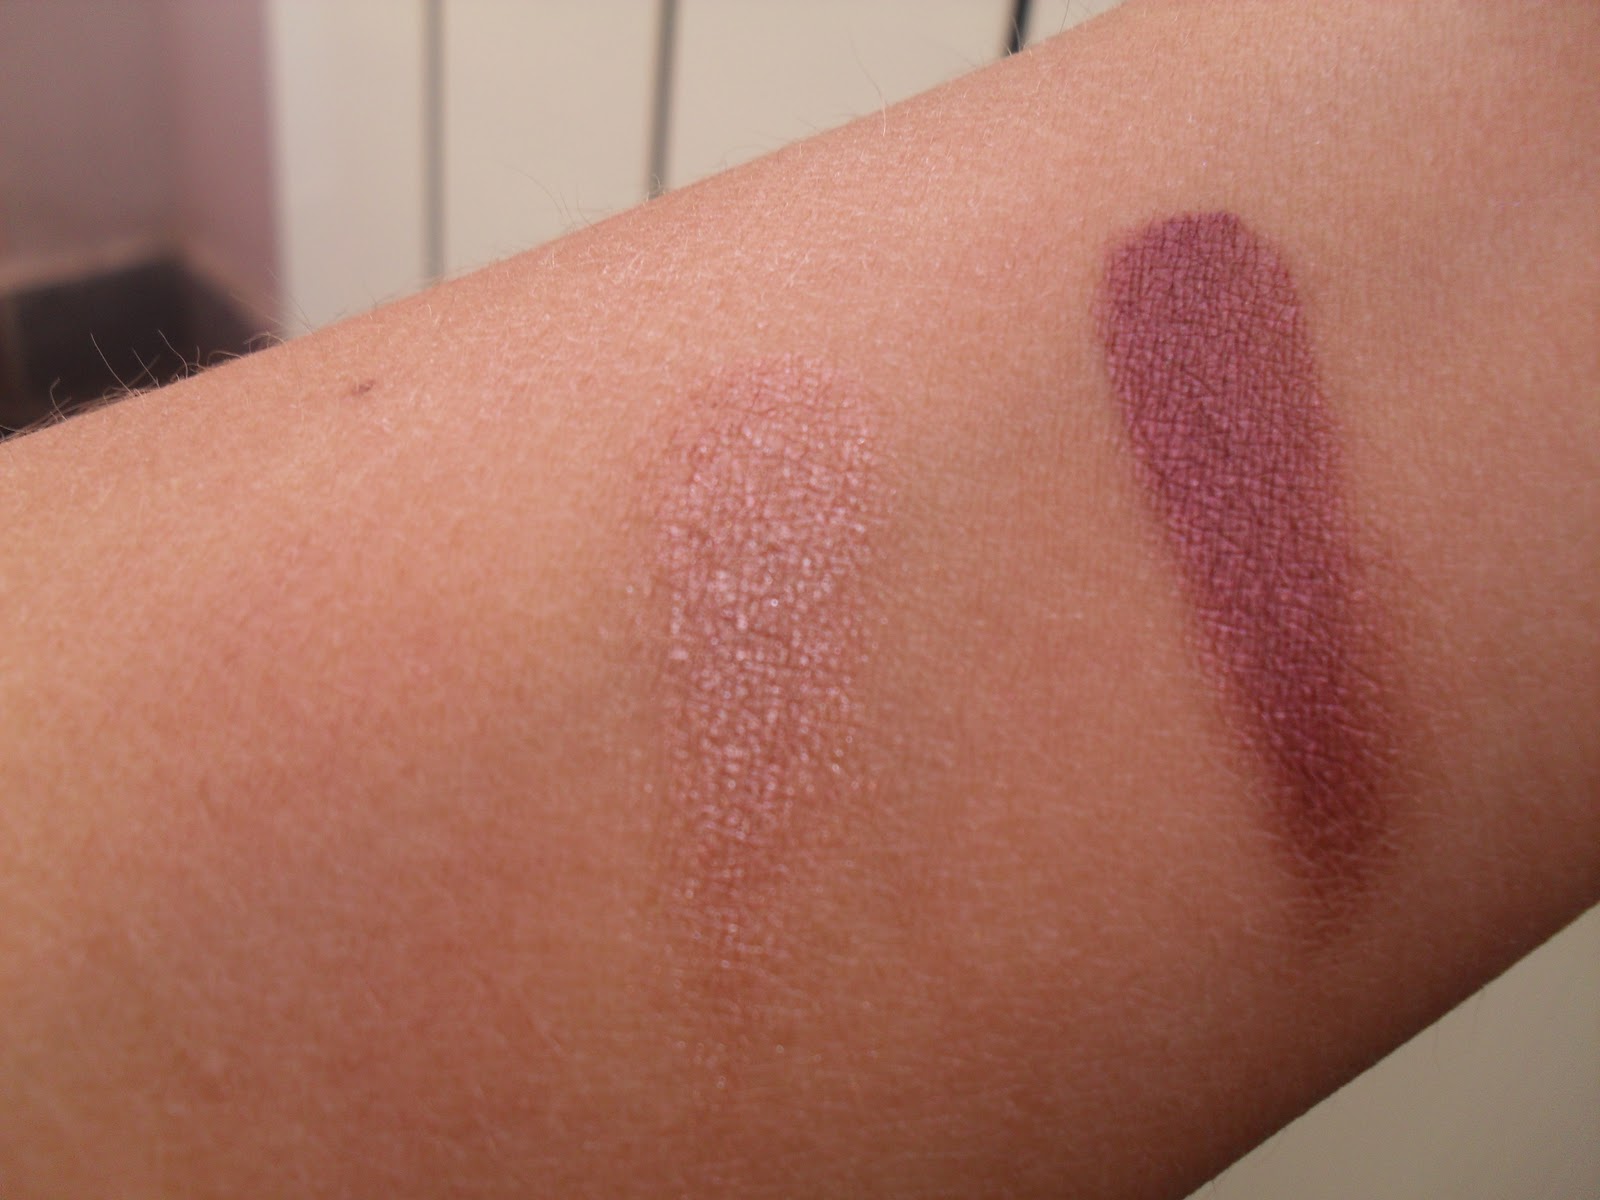
Stiletto, pictured on the right, is a shimmer (not frost, not metallic) burgundy color, a bit on the purple side.
Check this post, if you want to see how it looks on the eyes.
It is basically one of those colors that will suit pretty much anybody's eyes: on green, blue, and hazel eyes they will emphasize the color; on brown eyes, they will provide depht and warmth.
Beware, though: use an appropriate highlighter (something with a bit of golden shimmers) and good under-eye concealer, or it will make your eyes appear tired.

Stiletto, a destra nella fotografia è uno shimmer (non frost, non metallizzato) di colore vinaccia, un po' tendente al viola. 
Controllate questo post se lo volete vedere in azione.
Praticamente, è uno di quei colori che stanno bene a tutti: sugli occhi verdi,
blu, e nocciola, enfatizzerà il colore; sugli occhi marroni conferirà profondità e un po' di "calore".
Attente, però, ad usare un illuminante appropriato (qualcosa con i riflessi dorati) e un buon correttore anti-occhiaie,
o vi farà sembrare gli occhi stanchi. 

Overall, I think this is really a valuable product as its application is fast and will last throughout the day. Furthermore, it can be used as a liner (although, I think the color is too subtle for my tastes) or as a colored base, so it's multi-purpose.
The only downside is its price: I paid this 19 euros in Germany, so it is very very pricey. 

In generale, penso davvero sia un prodotto di valore, visto che la sua applicazione è rapida e dura tutto il giorno.
Inoltre, può essere usato anche come eyeliner (anche se penso che, in questo modo, il colore diventi un po' troppo chiaro)
o come base colorata, quindi è un 3-in-1.
L'unica pecca è il prezzo: io l'ho pagato 19 euro in Germania, quindi è molto molto costoso. 

Tip: make sure you screw the lid tight after use, as you don't want them to dry. Remember, they are cream products!
Un consiglio: assicuratevi di avvitare benissimo il tappo dopo l'uso, perché potrebbero seccarsi. Ricordatevi, sono prodotti cremosi!

Reperibilità in Italia: Sephora.

Saturday, January 14, 2012

Stiletto FOTD

Did you guys miss my FOTD's? - I did miss doing them!
So, this is my take on this winter trend for reddish eyeshadows.
Vi mancavano i miei FOTD? - A me tanto!
Ecco a voi la mia proposta per il trend di questo inverno: l'ombretto rossastro. 


I'm not cross-eyed. I just was too close to the camera, I guess.


Thumbs up if you like my "baby hair" and super ghostly photos! :D 
FACE:
Catrice Matt Mousse Foundation
Madina Milano Sublime Touch blush in Taffeta
Madina Milano Mr. Hide concealer

EYES
Benefit Creaseless Cream in Stiletto all over the lid and blended in the crease
Estée Lauder Berry Burst e/s to accentuate outer corner
Sleek MakeUP "The Mail" e/s (Oh So Special palette) over the crease to give a soft blend
MAC Vanilla pigment on the inner corner and on the brow bone
Catrice gel eyeliner in Mambo n° 2
Benefit They're Real mascara

LIPS
KIKO Red Emotion sheer lipstick in 100


Do you like the reddish eyeshadow trend? 
Tried it? Submit your comment and let me know, and if you took an FOTD for this trend, put a link below this post! 

A voi piace il trend dell'ombretto rosso di questo inverno?
L'avete provato? Commentate e fatemi sapere, e se avete fatto degli FOTD per questo trend,
lasciatemi il link qua sotto!

Friday, August 26, 2011

Benefit Haul


Creaseless Cream eyeshadows in Stiletto and Flatter Me

They're Real mascara.

I love them all, especially the mascara. It's impressive.

Please tell me if you want full reviews and swatches (colors aren't exactly a perfect match to reality)


Monday, August 22, 2011

Review: Benefit Realness of Concealness "mini fake-it" kit ( Ooh La Lift, Lip Plump, High Beam, Lemon Aid, Boi-ing)

Don't you just love Benefit kits? Sure, they are expensive, but no one else can beat the cute, vintage packaging, and the selection of products they put in them.
They are fantastic for those who want to try their products for the first time, but do not want to take the risk and spend 30 euros on one single product they are not sure they will like. Paying 30 euros to try five or more products is certainly more appealing. Especially when those five small little "sample-sized" products last you one entire year (or even more, I guess...).

Non adorate anche voi i kit di Benefit? Certo, sono un po' cari,
ma sono imbattibili. Quel packaging così carino, vintage, e la selezione di prodotti che si trova al loro interno....
Sono fantastici per coloro che vogliono provare i loro prodotti per la prima volta, ma
non vogliono rischiari di spendere 30 euro per un solo prodotto che non sono sicuri nemmeno gli piaccia. 
Pagare 30 euro per cinque prodotti è di certo meglio. Specialmente se quei cinque prodotti in taglia mini 
ti durano la bellezza di un anno intero (o forse, anche di più...).

The Benefit "Realness of Concealness" kit (also marketed as the "mini fake-it kit") contains:
1. mini size of Ooh La Lift
2. mini size of Lip Plump
3. mini size of High Beam
4. mini size of Lemon Aid
5. mini size of Boi-ing

So let us explore the products, skipping the fancy explanations Benefit has on their packaging or site.

Vediamo di esplorare i prodotti, saltando le accattivanti spiegazioni che Benefit ha sulle confezioni e sui siti

Ooh La Lift (full size: £ 16,50 - should be - but Benefit doesn't have an Italian website - around € 18):
An under eye circles brightener. It's a very light, cool pink light cream that you dab under your eyes. It contains raspberry extracts and light-reflecting pigments that will counteract your dark circles.
My verdict: it does help a bit, but it is nothing special. If you have super dark circles, this may not help at all. I still prefer concealers.

E' un illuminante per la zona occhi. Il colore è un rosa freddo molto chiaro, la consistenza quella di una crema
che si picchietta nel contorno occhi. Contiene estratti di lampone e pigmenti che riflettono la luce che aiutano a combattere le occhiaie. 
Il mio verdetto: aiuta un pochino, ma non è nulla di speciale. Se avete delle super occhiaie, sicuramente non farà niente. Preferisco di gran lunga i correttori.

Lip Plump (full size: £ 14,50 - should be around € 16 or more):
A lip primer "for full, sexy lips". It's colored as a concealer and helps evening out the surface of the lips so that your lipstick glides on smothly. It also helps to "erase your lips" so that you can trace them differently with your lip liner, and makes your lipstick last longer.
Definitely a useful product, especially for those who - like me - don't have a natural defined pout, but want to sport brighter colors on their lips.

Un primer per labbra "piene e sexy". E' colorato come un correttore ed aiuta a livellare la superficie delle labbra cosicché il rossetto scivoli meglio. 
L'altra sua funzione è quella di "cancellare" le labbra, in modo che si possano
tracciare contorni diversi da quelli naturali con la matita, ed aiuta anche a far durare più a lungo il rossetto. 
Decisamente un prodotto utile, specialmente per chi - come me - non ha una bocca ben definita ma vuole 
portare i colori accesi.

High Beam (full size: £ 18, 50 -  € 23):
Known as the "supermodel in a bottle", High Beam needs no presentation. Next to the infamous Moon Beam, it's the highlighter. On the pink side, shimmery, and creamy, you only need to dab and blend a very tiny amount of this product where you want lights to be reflecting (usually, top of the cheeks, cupid's bow, bridge of the nose, brow bone) and you will have the most subtle yet effective glow on your skin.
Bear in mind though, that this happens when you put the tiniest amount of it on. As it is shimmery, if you put too much of it on, you will end up looking like a discoball.
My verdict: lovely product, especially if you like creamy formulations. Although, I would only buy this in kits, as there are some exact dupes for less (for the full size bottle, I mean).


Conosciuto come la "top model in bottiglia", High Beam non ha bisogno di presentazioni.
Insieme a Moon Beam, è l'illuminante per eccellenza.
Sui toni del rosa, shimmery e cremoso, è necessaria una quantità veramente minuscola di questo prodotto
nei punti in cui si vuole che la luce rifletta (di solito, sull'osso zigomatico, sull'arco di cupido, lungo il naso e 
nell'arcata sopraccigliare) e avrete una luminosità discreta, ma anche molto efficace. 
Tenete bene a mente, però che questo accade solo quando usate una quantità di prodotto veramente minima.
Dato che è molto shimmery, se viene messo troppo prodotto, si rischia l'effetto "stroboscopio".
Il mio verdetto: prodotto adorabile, specialmente se si è fan delle formulazioni cremose.
Tuttavia, lo comprerei solo nei kit, perché in giro ci sono dei dupe che costano meno (certo, il prezzo in Italia è davvero poco accattivante!) 
 
Lemon Aid (full size £ 16,50 - should be around 18 or 20 euros):
Marketed as a color correcting eyelid primer, this is a product that I can't get the hang of. Basically, it's a lemon yellow cream helps to hide redness and discoloration on your eyelids. Problems are, though, that a. the cream isn't soft; b. it creases ridiculously. Ok, this is not a primer that's supposed to make your eyeshadow last or avoid creasing  (in fact, it can be worn alone), but still. You would expect something that you put on your eyes to correct the color not to crease and stay there, otherwise you'd end up in stripes of different colors on your lids, right?
Nope, this is the one product that let me down.

Pubblicizzato come il primer correttore per occhi, questo è un prodotto che non riesco proprio ad utilizzare.
Praticamente, è una crema giallo limone che aiuta a nascondere il rossore o la discromia delle palpebre.
I problemi però sono i seguenti: a. la crema non è soffice; b. fa immediatamente le pieghette. 
Ok non è un primer il cui scopo è quello di non far fare le pieghette all'ombretto
o farlo durare di più (infatti, si può anche portare senza ombretto), ma ad ogni modo ci si aspeetterebbe
che durasse proprio visto che corregge le discromie e non ci vogliamo di certo ritrovare con 
strisce di colori diversi sulle palpebre.
No, è proprio un prodotto che mi ha delusa. 

Boi-ing (full size £ 16,50 - € 21, 50):
The "industrial strenght concealer". My favorite one of all time. It is the concealer. It comouflages everything from dark circles to acne spots, and even covers birth-marks pretty well. I even bought a back-up of it, but I haven't finished the mini size in the kit yet (not even hit pan) and I've used it almot every day for almost one year. Fantastic! The tiniest amount covers everything. You can even use it to erase your lips!
Yes, it's rather pricey, but it's an excellent product that will last for ages.
A tip: when using under the eyes, dab the product rather than using swipe motions. The consistency is so creamy that it would get into lines.
My verdict: love at first use!

Il correttore "industriale". Il mio preferito di sempre. Il correttore per antomasia. 
Camuffa di tutto, dalle occhiaie ai brufoli dell'acne e copre anche molto bene le voglie. 
Ho addirittura comprato una riserva in full size di questo correttore, ma ancora, dopo un anno, non ho
finito (nemmeno ho iniziato a fare il classico "buchetto") la mini taglia contenuta nel kit 
e l'ho usato praticamente ogni giorno per quasi un anno. Fantastico, no?!
Anche una minuscola quantità di prodotto copre tutto. Lo si può perfino usare per "cancellare" le labbra!
Sì. è vero, costa tanto, ma è un prodotto eccellente che durerà un'eternità.
Un consiglio: picchiettatelo invece di tirarlo. la consistenza è molto cremosa e se non fate così nel contorno occhi, 
rischiate che vi vada nelle pieghette. 
Il verdetto: amore a prima applicazione!

Overall considerations:
The kit is definitely worth a try. It retails for € 33 which you would think are too much, but you get the chance of trying five products, and some of them are real gems. Also, despite the tiny dimensions, it will last for ages.

Considerazioni generali:
Vale decisamente la pena di provare questo kit. Per 33 euro, che sembrano inzialmente troppe, avete l'opportunità
di provaare cinque prodotti, e alcuni di questi sono davvero delle chicche.
In più, a dispetto delle dimensioni che sembrano davvero minuscole, durerà per secoli. 

Saturday, August 13, 2011

FOTN: Alchemic Misdemeanor

I apologize for the lack of FOTD posts lately, but ever since I moved to another house I don't have the right space and the right lighting to take such pictures.
Hopefully, the situation will change in September, when I move out again, and I will be living in a nice apartment on the 5th floor (right opposite my work place) where I get a lot of light during the day time.
In the meantime, enjoy the look I sported last night, while I was at a rock concert with a couple of friends and my brother.
I opted for a greyish green smoky eye, with some speckles of blue. Such an unusual color that only Urban Decay produces (as far as I know): Misdemeanor. Now, pictures do not do it justice, but I promise I will replicate this when I move to my new place and I can take a decent shot.
It was much more smoked out and also darker.
And of course, eventhough I used one of the darkest shades of foundation around, SPF + Flash washed out my face. Enjoy the difference in shade between my visage and my neck...


PRODUCTS USED
Face
Clarins Skin Illusion foundation in Chestnut*
Clinique Almost Bronzer*
Cargo blusher in Rome*
Benefit Boi-ing concealer
Illamasqua Powdered Metal in Ether as a highlighter*
Bare Minerals Mineral Veil as a setting powder on my cheeks (hides pores) and T-zone

(quite a few products on my skin, but it's a night time look)

Eyes

Urban Decay Misdemeanor all over the lid and smoked out on the crease
Urban Decay Sellout on the browbone
Urban Decay Half Baked on the inner corner
Illamasqua Precision Ink in Alchemy on the inner part of the lower lash line*
KIKO Luxurious Lashes mascara

LIPS
Clinique High Impact Lip Colour in Magenta Rose* (similar to Cherries in the Snow, lovely!)

Disclaimer: products marked with * were sent by companies for reviewing consideration

Wednesday, February 9, 2011

Benefit Erase Paste Review (EN - IT)

Following this post about one Benefit product that I hated (Some Kind-a Gorgeous), I'm now going to review one product from the same brand that I really like: Erase Paste.
I've had the chance to try Erase Paste thanks to Michelle (from Lipstickrules.com, click on her name to discover her blog, if you haven't already) sent me a sample of it in our international swap. Now, despite the sample size is very small, I have started using this concealer in September, I think, and I've used it quite often and still have a lot left.
Therefore, the first thing I have to say about it is: a little goes a long way.
As the name suggests, Erase Paste is a paste-like concealer that you use to camouflage your under-eye circles. Very thick in consistency, Erase Paste comes in shades that are peach-based, because that's the right colour that will illuminate your under-eye area, making dark circles appear less obvious.
Now, I have heard many different opinions about this product: some say that it's too thick in consistency and goes into lines and wrinkles, some others say it creases...I guess it really depends on your under-eye skin and on your type of dark circles.
Personally, it does a good job for me: it illuminates the area, and conceals dark circles very well. It does not crease on me, or get into lines, but I guess that's because I have very dry skin under the eyes. Also, I don't have very dark circles.
You only need a very tiny amount of this concealer, as it covers really well, and otherwise it's going to look cakey.
Overall, I think this is a very good product from Benefit, and I do recommend it (of course, if you can get a sample of it, before you buy it, it's going to be even better). Despite being pricey (there are less than 5 grams into the pot, and the price is around $20 or £20), I can assure this will last you for ages, so there is really no use in buying 3 concealers that will last for a shorter period of time, instead of investing in a good one that will last you for ages. At least, this is my personal though on foundations and concealers.
*Memento for those of you who are more attentive to ingredients: this may not be the right product for you. In fact, Petrolatum - in its multiple forms - reiterates throughout the INCI. Furthermore, there also are some parabens there*
Didn't have time to photograph my eye. But look at my veins there...hideous...
Now, here I've used a very very very tiny amount of Erase Paste and the veins are almost gone and generally the wrist has more light. Remember I used the tiniest amount!

ITALIANO:

In seguito a questo articolo in cui vi ho parlato di un prodotto della Benefit che non mi è affatto piaciuto (Some Kind-a Gorgeous), ora recensirò per voi un prodotto della stessa casa cosmetica che, invece, mi è piaciuto parecchio: l'Erase Paste.
Ho avuto l'opportunità di provare l'Erase Paste grazie a Michelle (del blog Lipstickrules.com, cliccate sul suo nome per scoprire il suo blog, se ancora non lo conoscete) che me ne ha gentilmente inviato un campione nel nostro scambio cosmetico. Ora, nonostante la taglia del campioncino sia davvero piccola, ho iniziato ad usare il correttore a Settembre, mi pare, usandolo veramente molto spesso ed ancora ce n'è parecchio nella confezione.
Perciò la prima cosa che vi posso dire di questo prodotto è che: ne basta veramente poco per coprire tanto!
Come dice il nome stesso, Erase Paste è un correttore dalla consistenza pastosa, che si usa per camuffare le occhiaie. La consistenza è molto densa e questo prodotto è venduto in colorazioni che hanno sottotoni color salmone, perché questo è il colore adatto per illuminare l'area dell'occhio, in modo da far apparire meno ovvie le occhiaie.
Ora, io ho sentito opinioni divergenti su questo prodotto: alcune dicono ch'è troppo denso in consistenza e che va nelle linee e nelle rughette, altre dicono che si scoglie e cola...Penso dipenda molto dal tipo di pelle che si ha sotto gli occhi e dal tipo di occhiaie.
Basta veramente una quantità minuscola di questo correttore per coprire benissimo le occhiaie, altrimenti - mettendone troppo - potrebbe sembrare troppo calcato e farvi un mascherone.
In generale, penso sia un buon prodotto della Benefit e lo raccomando (certo, se poteste provarne prima un campione, prima di comprarlo, sarebbe anche meglio). Sebbene sia un po' caro (non sono nemmeno 5 gr ed il prezzo si aggira intorno ai 20€), posso assicurarvi che vi durerà davvero tanto, perciò se calcolate che comprando magari 3 correttori diversi che vi durano meno spendete alla fine anche più del prezzo dell'Erase Paste, io credo sia meglio investire in questo. Perlomeno, questa è la mia opinione personale su fondotinta e correttori.

*Una nota per le ragazze più attente agli ingredienti: forse questo prodotto non è adatto per voi. Il petrolato, declinato in varie forme si reitera per tutto l'inci. Inoltre, è presente anche qualche parabene.*

Thursday, February 3, 2011

Some FOTD's and a nice surprise (for me)

 Yesterday's face, for work:

Products used
Face:
Madina Milano Skin Architect Foundation
Benefit Boiing concealer
Bourjois Blush in Cendre de Rose Brune

Eyes:
Bellapierre Make-up Base (review coming soon)
Elizabeth Arden e/s in Sand
Madina Milano Prismashine in 17 Dark Quartz
Maybelline Gel Eyeliner
KIKO Dual Glam eye pencil in brown
KIKO Luxurious Lashes Mascara (post coming soon)
Soap & Glory Hocus Focus highlighter

Lips:
Smashbox lipgloss in Couture

And following my other post (click here) about plain eyes and bold lips, I tried the following combination, very unusual for me:
 (picture taken after a day at work and library)
On my face:
Diorskin Nude foundation
MeMeMe Poppy Tint on the cheeks

Eyes:
Maybelline Gel Eyeliner
Maybelline The Falsies mascara (Want a review?? It's not positive...)

Lips:
KIKO Red Emotion Sheer Lipstick in Hot Pink Kiss (107)
Gosh Darling Lipstick

Now, in case you think the jewelry I was wearing in those pictures looks great (which I must agree on), I'll tell you all about it:
On Monday, I ended a course with one my classes in Olbia. It was definitely my favourite classes, all the students were kind, motivated and very polite. We established a great atmosphere during the months, and each class was both informative/educational and fun.
They must have liked me as a teacher, so they brought me a gorgeous gift: the necklace and earrings I was wearing in the above (and below) pictures.
I love it! They really shouldn't have given me any gift, I've just done my job (hopefully well), but it was greatly appreciated. It fills my heart in with joy, to know that they loved my lessons.

By the way, the jewelry is from Dudu Bijoux, in case you're wondering ;) (they also have a site)

Tuesday, February 1, 2011

Yesterday's FOTD: plain eyes and bold lips

Yesterday I wanted to be quick but effective with makeup (and I also wanted to try my new Maybelline gel liner, which I must say I'm impressed with, for now) and opted for the plain eyes and bold lips theme.
The lippie was actually a full on plummy-magenta, a bit tricky to capture with my camera.

PRODUCTS USED:
FACE:
Madina Milano Light Foundation
Diorskin Nude Foundation
Sleek Flamingo Blush (I absolutely hated putting it on with a duofiber brush. I prefer this brush for foundation)
Benefit Boiing Concealer

EYES
Bellapierre Make-up Base (similar to painterly paint pot by MAC)
Maybelline Eyestudio Gel liner
Ellis Faas Mascara
Diego Dalla Palma black eyepencil

LIPS 
KIKO Precision Automatic Lip Liner in 05 (from the Siberian Flowers Collection, currently on sale in KIKO Stores and gone forever from the site!!!)
KIKO Red Emotion Satin Lipstick in 207 - Ultimate Plum


PS: KIKO is currently having sales on the Siberian Flowers collection too. get on their site: www.kikocosmetics.com

Tuesday, January 18, 2011

blog sale haul


At the end of last year I purchased something from Emma's blog sale (follow her blog, BIRDS DECORATE BRANCHES) at very barganeous prices. Also everything is unavailable where I live, so I am super happy with my purchase.
As you can see I have got the Benefit Boiing concealer, which I truly love (I will review it and the rest of "The Realness of Concealness" kit soon), the Stila Smudge Pot in Starry Night, and the OPI Pink of Hearts nail polish (my first OPI polish). Emma was kind enough to offer the nail polish for free :D Thank you so much honey!
If you want me to review anything from this purchase, just leave a comment below. In the meantime, here is a swatch (photo taken with artificial light) of the Stila Smudge Pot:

Monday, November 22, 2010

Benefit Some Kind-a Gorgeous Review


When it comes to Benefit, I am really a newbie. I have only started using their products in the summer, and since I loved them. I thought Some Kind-a Gorgeous could live up to the expectations...little did I know....

Posso dire di essere una novellina quando si tratta di Benefit. Ho iniziato ad usare i loro 
prodotti solo quest'estate e mi son piaciuti molto. Pensavo che anche il Some Kind-a Gorgeous potesse mantenere le aspettative...beata ingenuità!

This product is marketed as a "foundation faker", and no other description would have fit this product more perfectly. Not for the reasons they want us to believe in, though. 
I quote from Benefit's website, this is described as an "oil-free, cream-to-powder finish fakes foundation...it's silky, even perfection for your complexion".

Questo prodotto è pubblicizzato come il "foundation faker", e penso che nessun altra descrizione sarebbe stata più appropriata di questa. Non per le ragioni che vorrebbero indurci a credere però. 
Cito testualmente dal sito di Benefit, questo prodotto è descritto come 
"oil-free, cream-to-powder finish fakes foundation...it's silky, even perfection for your complexion".

Well, I have to say that either I have the wrong product, or the description does not really correspond to the reality.
Now, I know that a lot of people would comment saying that they love this, but they probably have a different skin than mine, so Benefit should warn people this is for some skin types only.

Beh, devo dire che o io ho il prodotto sbagliato, oppure la descrizione del sito non corrisponde alla realtà.
Ora, so che molte persone commenteranno scrivendo che adorano questo prodotto, ma 
probabilmente hanno una pelle diversa dalla mia, perciò credo che sarebbe stato meglio se Benefit avesse dichiarato apertamente che questo prodotto funziona bene solo su certi tipi di pelle.

On my skin, I have found this foundation does not set as powder at all. It remains very creamy, and shiny, in a way that does not give you a glow, but more of a grease.
It transfers on anything, and you cannot touch your face at all, otherwise you would compromise your entire makeup.
Coverage-wise, this is really more of a tinted moisturizer (eventhough it is not a moisturizer) than a foundation, therefore if you have large pores, zits, or general imperfections, just do not trust this.
Another thing that I have hated is the fact that if you smile a lot, this tends to form very thick lines around your eyes, making you appear as an 80 year old lady. Definitely not what I look for at the age of 26!

Sulla mia pelle questo fondotinta non si asciuga diventando polvere, per niente!
Rimane molto cremoso e luminoso in una maniera che sembra più che altro grasso. 
Va via molto facilmente e non ci si può toccare il viso che si rischia di compromettere l'intero lavoro. 
Per quel che riguarda la coprenza, è più una crema colorata (nonostante non sia una crema) che un fondotinta, quindi se avete pori dilatati, brufoli, o in generale imperfezioni, non fidatevi di questo prodotto!
Un'altra cosa che ho detestato è il fatto che se si sorride tanto, questo prodotto tende a creare
delle linee tipo rughe molto pronunciate intorno agli occhi, facendomi sembrare un'ottantenne. 
Decisamente non è ciò che voglio all'età di 26 anni!

The only nice thing about this foundation is the packaging, which is really cute. But what's packaging for, when the product is not worth it?
At $28,00 (or £ 21.50) this is not really something you would buy just for the packaging or just to try it.
Quite fortunately, I purchased it in a blog sale (Louise's) for a very small fraction of the price, so I do not regret buying it.

La sola cosa che mi è piaciuta è la confezione, che è davvero molto carina.
Ma a che serve la confezione, se poi il prodotto è inservibile?
Per $ 28,00 (o £21.50) non è davvero qualcosa da comprare solo per il packaging, o perché lo si vuole provare. Fortunatamente, io l'ho acquistato da una blog sale per un decimo del prezzo, per cui non ho rimpianti.

Don't worry, I'm not a Benefit hater, but I think the brand is actually a hit and miss for certain things, and to think that it is even oh-so-expensive does not really encourage me to buy without swatching or trying first!


Non vi preoccupate, non odio Benefit, ma penso davvero che questo marchio non faccia 
sempre prodotti fantastici, e visti i prezzi davvero esorbitanti non sono davvero portata a comprare i loro prodotti senza prima swatcharli o provarli!

Sunday, October 17, 2010

Bronze Prodige: and fotd using Clarins, Madina, Ellis Faas, and many more

If you are wondering why the title, it's soon to be said: it was inspired by the colors, and the new, gorgeous collection from Clarins, ROUGE PRODIGE.
The lipstick I am wearing is, in fact, part of this collection.
A full review of the products I own from this collection is coming soon.

Se vi state chiedendo il perché del titolo, è presto detto:
è stato ispirato dai colori del trucco e dalla nuova, bellissima collezione di Clarins: ROUGE PRODIGE.
Il rossetto che indosso in queste foto, infatti, fa parte di questa collezione.
Una recensione completa dei prodotti di questa collezione che sono in mio possesso ora arriverà presto.


PRODUCTS USED:

FACE
Benefit the POREfessional job as a base on the cheeks
Madina Milano Light Foundation*
Madina Milano Exact Colour Bronzer
Madina Milano Bivalva Extreme blusher in ...12? I can't remember.

EYES:
Ellis Faas Light e/s in E303 (golden bronze, all over the lid)*
Cargo bronze e/s from the Baja palette(crease)*
Cargo bronze-taupe e/s from the Baja palette (outer V)*
Smashbox dark bronze (outer v and crease) - it's from a quad, has no name.
Smashbox light yellow e/s from the Smashbox quad (inner corner and highlighter)
KIKO Dual Glam liner (brown)*
Ellis Faas mascara*

For the brows: some e/s from the Sleek Chaos palette

LIPS
KIKO automatic Lip Pencil from the Siberian Flowers collection in 05*
Clarins Rouge Prodige lipstick in Raspberry Sorbet*

Hope you like this ;)

*disclaimer: products marked with an * were provided by PR for consideration

Friday, October 15, 2010

M.A.C. Shale FOTD


Please never mind my horrible skin at the moment!
I shall be on the pill again from next month.... :(

PRODUCTS USED:

FACE:
Benefit Some Kind-a Gorgeous foundation (review to come soon)
Benefit Lemon Aid + Boing Concealer
Benefit High Beam
Madina Milano Sensual beauty all over to contour*
Sleek MakeUP blush in Flamingo

EYES
UDPP
MAC Shale all over the lid
Madina Milano Bivalva Smart Eyeshadow (light taupe) on the inner corner
Smashbox bordeaux e/s (don't know the name of it, it's in a quad) on the outer corner, lower lashline and crease
KIKO Double Glam Eyeliner in Plum*
KIKO Luxurious Lashes mascara*
over Layla Milano Base Allungaciglia*
Layla Lash Art mascara in purple on the lower lashes*
KIKO Ombretto ad Alta Pigmentazione n 122 (to blend) and 127 (to highlight)*

LIPS
Soap and Glory Sexy MotherPucker lipgloss in What-a-Melon*

hope you like this!

*Disclaimer: items marked with an * were provided by PR for reviewing consideration

Friday, September 24, 2010

Exploring winter trends: black cherry lipstick

Products used:

FACE
KIKO Sunproof Cream Foundation
Madina Milano Exact Color Bronzer
KIKO Sun Bronzing trio in highlighting coral on the cheeks
Benefit Erase Paste

EYES
Eldora Lashes (the same that I have on the giveaway) REVIEW COMING SOON

LIPS
KIKO Red Emotion Lipstick in Black Cherry (Dupe for Illamasqua's Growl, although it is slightly warmer in the picture)

Friday, September 10, 2010

I am back - plus Dublin haulage

Hi girls,
how are you doing? I am sadly back from the charming "Dirty Old Town" of Dublin.
I might film a vlog about it, and then I'll also make a pictures post. However, as I have so many pictures to choose from, I'd rather post my haulage now.


Oasis tunic shirt
was € 69,00 reduced to € 25,00 for a manufacturing fault (which is tiny and you can't see) and was now € 6,00 cos they had only 4 pieces left!
Bargain!

Where: Oasis @ Clerys in Lower O'Connel St.


Penneys (same thing as UK's Primark) small dress
-I know it looks like a shirt, but I can tell you it is not -
€ 13,00

Where: Penneys Mary St & Lower O'Connel St.

also available in black


Penneys Frill Button Dress/Tunic
€ 15,00

Where: Penneys Mary St & O'Connell St.

also available in black, and antique rose


Penneys' Opia Jewellery:
Necklaces: Wood & Mix Bead - € 3,00
Clock Charm Pendant - € 5,00
Long Chain Mix - € 5,00
Vintage Brooch - € 3,00
also pictured from Primark: Satin and golden headband - € 2,00

Topshop's Freedom Jewellery:
Golden Doves earrings - € 8,00 (I got them for my mom...)
Silver Angel Wings earrings - € 8,00

Where: Penneys Mary St. & Lower O'Connel St
Topshop St. Stevens St.


MAKE-UP, TOOLS, AND SKINCARE

*note: lighting was poor today at home, sorry if pictures don't capture the exact colors*


M.A.C. Satin e/s in Shale (taupe with purple undertones)
I can't remember the exact price anymore, but it was around € 14,94

Where: M.A.C. counter in Brown Thomas - Grafton St.


M.A.C. Satin Taupe e/s (frost)
same price as above

Where: again, Brown Thomas - Grafton St.


close up:
Benefit The Realness of Concealness mini fake-it kit
Contains:
Ooh la lift (depuffier)
Lip Plump (lip primer)
High Beam (highlighter)
Lemon Aid (color correction for eyelids)
Boi-ing (industrial strength concealer)

€ 33,50

Where: Brown Thomas - Grafton St.


The POREfessional by Benefit
pore minimizer balm
€ 33,50

N°7 brushes ( 2 dupes for MAC's 217 and a smudger)
€ 7,00 each (free if you redeem a N°7 voucher)

Models Own Lemon Meringue nail varnish
€ 6,50

Tangle Tweezer Compact
€ 14,29

Where: Benefit counter @ Brown Thomas - Grafton St.
Boots @ St Stephens Green Shopping Centre

PS: not pictured, a S&G The Fab Pore hot cloth cleanser back up, because I love that stuff!!!

If you would like me to review anything you see, please feel free to request it.

I wrote prices and stores in case anyone is going to Dublin and want to know where to find things straightaway ;)

Just a little side note: I had never been to a MAC counter before, so I don't know, are all shop assistants there incredibly made-up? I mean...everyone had this amazingly dramatic makeup, with uber long false eyelashes. Of course, it was perfectly executed.

Hope that was both enjoyable and useful,

Lyd